Well, here we are, the weekend before Thanksgiving. I know it’s only one day but it seems the several days before the day we are bustling with activity on the homestead. Fortunately we have a couple of beautiful turkeys we raised sitting in the freezer for the last two feasts of the year.
We are pretty consistent with our Thanksgiving menu and not all of it is made from goods from the farm, however, having a farm-fresh, naturally-raised turkey is certainly one of the highlights of our meal! Today I want to discuss what a brine is and why I think you should brine your turkey. WORD OF WARNING: if you purchased a turkey, make sure it is not already salted or brined. Many Turkeys you buy are already brined, if you brine it again you will end up with a VERY salty bird.
WHAT IS A BRINE?
A salty solution used for marinating and improving moisture-retention in lean meat.
WHY BRINE?
Brining improve’s the turkey’s ability to retain moisture during cooking. Denaturization happens during cooking, which means that muscle proteins are broken down causing the muscle fibers to contract and bind together leading to loss of moisture. This denaturing process can be also be started through the use of salt which allows for retention of moisture between the muscle fibers before cooking. Basically, once these proteins are dissolved by the salt, muscle fibers lose some of their ability to contract during cooking therefor less moisture is lost. There is some controversy concerning brining, whether there is benefit or not, from experience I can say there is definitely a noticeable difference as long as you have used the correct ratios for a traditional brine and you allow adequate time for brining. Brining also has the added benefit of seasoning the bird more deeply than simply salting just before cooking.
TRADITIONAL BRINE
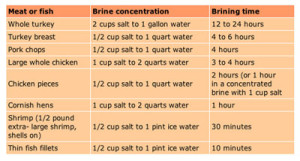
Since I started brining my turkey, I have relied on a very basic traditional brining recipe using only salt and water. The last couple of years I used apple cider and broth and added other ingredients such as orange peels, herbs, peppers, garlic, etc. But I found no added benefit from the addition of those ingredients. It increased the work involved and required many more ingredients with no real noticeable difference in taste. Now if you have a favorite brine recipe that includes a plethora of ingredients then, by all means, feel free to continue using it. The key with traditional brining is ratio of salt to water and the time you allow. The chart below shows the concentration as well as time for different types of meat. The concentrations listed are for Diamond Crystal kosher salt. For table salt cut salt amounts by 1/2; for Mortons kosher salt cut amounts by 1/4.
If you plan on doing the traditional brining method, may I suggest using a roasting bag or large plastic bag to keep your turkey in? This ensures every part of the turkey is submerged in the brine and makes clean up a lot easier! You can keep it in the bag in a cooler or a 5 gallon bucket.
DRY BRINE
This year, I am stepping out of my comfort zone and actually doing something a little different. I am going to try a dry brine. From my research it will have the same effect on the muscle, the difference here is that it causes retention of the turkey juices rather than absorption of the brining liquid leading to a deeper, more flavorful turkey. Now, I may find that the traditional brine is better, but I’ll never know unless I experiment, which is something we like to do on the homestead! So here is the recipe and ingredients for the dry brine:
- 1/2 cup Diamond Crystal kosher salt (or 6 tablespoons Morton’s kosher salt)
- 2 Tablespoons baking powder
- Dry herbs (optional)
- Pepper (optional)
- Mix ingredients in a bowl.
- Pat your turkey dry.
- Generously sprinkle the mixture on all surfaces of the turkey. The turkey should be well-coated though not completely encrusted. (I plan on loosening the skin and rubbing some directly on the meat. particularly on the breast which tends to dry out more readily)
- Place the turkey in a rimmed baking sheet and refrigerate uncovered for 1-3 days. (I intend to leave it for 3 days since I read that the longer it sits the better it will be)
- Roast it WITHOUT rinsing it. You can follow any recipe but omit the salt since it is already on your turkey. NOTE: You can include dry herbs in the dry rub brine if you wish, which would allow you to simply cook the turkey as is with no additional work before baking – not sure if I’ll do this ahead of time or not, but maybe.
Dry brining is supposed to lead to a very juicy bird with a crispy skin. I am a fan of fried turkey which we have avoided the last few years due to the expense of peanut oil (the only kind I like to fry turkey in) so I’m hoping this will have the same kind of results!
If you do not want to take up space in your refrigerator here’s an idea – put a couple of bags of ice at the bottom of a cooler and set the baking pan on top. Check the cooler once in a while to ensure the ice isn’t melted. I will be keeping mine in the garage which should keep it cool enough.


Leave a Reply
You must be logged in to post a comment.